ps4 hard upgrade
hello every one today i want to tell you how to upgrade your ps4 hard drive
Reasons to Replace the Internal Hard Drive
You might need or want to replace the internal hard drive of your PlayStation®4 system for the following reasons.
- You want to add additional storage space to your system.
- You want to increase performance speed.
- Your hard drive failed.
These instructions apply to PS4™ full size models CUH-1000 through CUH-1200, and model CUH-1215. Follow the steps below to replace the internal hard drive and reinstall the system software after the replacement.
For PS4™ Pro instructions, read Replacing Internal Hard Drive on PS4 Pro.
For PS4™ Slim instructions, read Replacing Internal Hard Drive on PS4 Slim.
Replacing the internal hard drive does not void the PS4™ warranty.
Steps to Replace PlayStation®4 Internal Hard Drive
What You Need
- PlayStation®4 full size system - models CUH-1000 to CUH-1200 or model CUH-1215.
- Officially supported replacement hard drive. Only the 2.5 inch internal type (9.5mm or slimmer)* and serial ATA (Parallel ATA is not supported) internal hard drives are officially supported with the PS4™ system. Proper operation is not guaranteed for all models if other drive types are used.
- Phillips screwdriver.
- Computer connected to the Internet.
- External storage device, such as a USB flash drive, with at least 1GB of free space.
1. Back Up Your Data
Use an external storage device to back up your entire PS4™ internal hard drive with all game, app, saved data, captures, and themes.
Back up data to an external storage device
- It’s important to sync your Trophies first since they're not included in the backup data. Go to [Trophies], press the OPTIONS button, and select [Sync Trophies With PSN].
- Go to your PS4™ Home screen, and insert the external storage device you'd like to use for the backup into one of the PS4™ USB ports.
- Go to [Settings] > [System] > [Back Up and Restore].
- Select [Back Up].
- Confirm which data you'd like to back up.
- If you choose not to back up [Applications], you'll need to download or reinstall them when you eventually restore the data on the system with the backup you're creating.
- It's important to back up [Saved Data] to avoid losing any game progress during the hard drive replacement.
- A progress bar will show the current status of the backup. You can cancel this any time.
- On the next screen, you can customize the name of the backup. When done, highlight [Back Up] and press the X button.
- Remove the external storage device from the PS4™ system.
PS Plus subscribers: Back up saved data to online storage
If you're a PlayStation®Plus subscriber, you have the option to back up your saved data to online storage for your account on PlayStation™Network in case your external storage device doesn't have enough space for all data.
You can save up to 100GB of game save data and up to 1000 saved data items.
Saved data is the only data type that can be backed up to online storage.
You can save up to 100GB of game save data and up to 1000 saved data items.
Saved data is the only data type that can be backed up to online storage.
- Sign in to PlayStation™Network on your PS4™.
- From the Home screen, select [Settings] > [Application Saved Data Management] > [Saved Data in System Storage]
- Select [Upload to Online Storage].
- Select the title and then the file you would like to upload. If you would like to upload all files, select [Select All].
- Click [Upload] to start the uploading process. You will see the progress bar on the next screen.
2. Remove the Old Internal Hard Drive
- Make sure the PS4™ is completely turned off. When the power indicator is off, the system is turned completely off. If the power indicator is lit up in orange, the system is in standby mode. Exit standby mode.
- Unplug the AC power cord, and then disconnect the other cables from the system.
- For safety reasons, remove the plug for AC power cord from the electrical outlet, and then detach the other cables.
- Place both of your hands on top of the hard drive cover (the top left part of the system) and slide it to the left (see the diagram below). Lift the right side first when lifting and removing the cover.

- Remove the internal hard drive
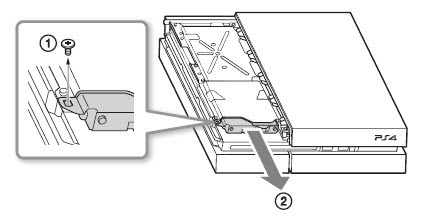
- PS4™ full size system models CUH-1000 through CUH-1200
- Remove the screw (see diagram 1 below).
- Pull the internal hard drive toward the front of the system to remove it (see diagram 2 below).
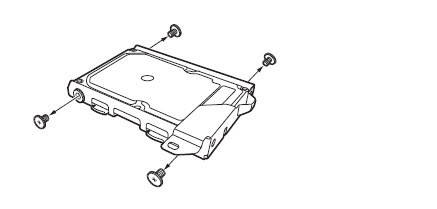
- Using a Phillips screwdriver remove the four screws from the sides of the hard drive case. Do not remove the rubber inserts from the screw holes (see diagram in Step 6).
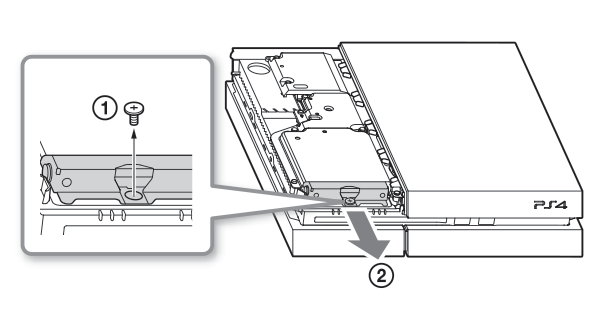
- PS4™ full size system model CUH-1215
- Remove the screw (see diagram 1 below).
- Pull the internal hard drive toward the front of the system to remove it (see diagram 2 below).
6. Using a Phillips screwdriver remove the four screws from the sides of the hard drive case (see diagram below). Do not remove the rubber inserts from the screw holes.
3. Install the New Internal Hard Drive
- Place the replacement hard drive on the mounting bracket for the PS4™ system's hard drive, and then attach it with the screws (four places). Do not over-tighten the screws.
- Attach the internal hard drive to the system using the screw. Be sure to fully insert the hard drive in the hard drive bay.
If you lose the hard drive cover, screws, mounting bracket, or any other parts, contact technical support for assistance.
4. Install the PS4™ System Software on the New Internal Hard Drive
Update file on PS4 System Software Update page has additional files necessary to initialize your new hard drive. Download the new system software update file from the page and install the system software in Safe Mode.
Download the software to an external storage device
- Visit PS4 System Software Update page and follow the instructions on preparing your external storage device and downloading the update.
- On the computer, save the system software update file for re-installation to the external storage device (1GB free space).
Install the software
- With the PS4™ off, enter Safe Mode by pressing and holding the Power button until you hear the second beep (hold the Power button for about 7 seconds).
- Select option 7 [Initialize PS4 (Reinstall System Software)], and press the X button.
- Plug the external storage device prepared with the system update into a USB port of the PS4™. Click [OK] and press the X button.
- In a moment, a screen will appear showing that a system update is available. Choose [Next] and press the X button. The update file is copied to the PS4™.
Complete the update
- Once the copy is complete, read System Software License Agreement. If you agree, select [Accept], and press the X button to confirm your choice.
- Select [Next], and press the X button to confirm your choice. The system software is now installing onto the PS4™.
- After the update is completed, the PS4™ will restart another time. Once it is finished booting up, press the PlayStation button on your controller and log in with your user profile.
- Next, a screen will ask you to sign in to PlayStation™Network (PSN). Select [Next] to sign in with your existing account on PSN (or create a new one). Select [Skip] to sign in or sign up for PSN later. To create a new account, from the PS4™ sign-in screen select [New User] > [Create a New User] and follow the on-screen prompts to create an account on PSN.
- Verify the system version by going to [Settings] > [System] > [System Information] screen.Your system is now updated.
5. Restore Backed Up Data to the PS4™
Restore data from an external storage device
- Go to [Settings] > [System] > [Back Up and Restore].
- Insert the external storage device that contains the backed up data into one of the PS4™ USB ports.
- Select the [Restore PS4] option.
- Select the backup file you'd like to restore.
- You'll see a screen that tells you that the system will restart and initialize whether or not the backup process is completed. Select [Yes] to continue.
PS Plus subscribers: Restore saved data from online storage
- Sign in to PlayStation™Network you were signed into when you uploaded the saved data to the online storage.
- From the Home screen, select [Settings].
- Select [Application Saved Data Management] > [Saved Data in Online Storage] > [Download to System Storage].
- Select a title and file you'd like to restore.
- Select [Download]. You can redownload all of your previously downloaded data by going to your Library.
Now that your PS4™ internal hard drive is upgraded, the system software reinstalled and all saved data restored to the system, you can use it and enjoy all the content and services as usual.
Having Issues Accessing Storage or Installing Software?
Error CE-34335-8 - Cannot Access System Storage
Follow these troubleshooting steps if you see the error message “Cannot access system storage” on your PS4™.- Try to access PS4 Safe Mode option 7 [Initialize PS4] (Reinstall System Software).
- Power the PS4™ on again to see if you can see the Dynamic menu on the Home screen.
Error CE-34788-0 - Update File Cannot Be Used
Repeat the system software installation steps and make sure you're using the correct update type and the files are placed in the correct folders.
- Go to 'Perform a New Installation of the System Software' section in PS4 System Software Update page.
- Follow the instructions carefully making sure the downloaded update file is saved with the file name "PS4UPDATE.PUP" and saved in the "UPDATE" folder.


Comments
Post a Comment